

Shopify Multivendor Marketplace App
Introduction
Shopify Multi Vendor Marketplace app is a great tool to convert your shop into a fully functioning marketplace. It facilitates the process of adding sellers and keep track of their sales. Sellers can create their own shop with variety of products. Admin can easily set individual commission and global commission for all the sellers.
Features
- Admin can set global commission for all the sellers & can also set separate commission for individual seller.
- Admin can add new sellers through CSV file.
- Admin and seller, both can upload products through CSV file.
- Admin can also import the existing products to his shop.
- No security or access right issue, as only admin can login from backend.
- Admin can choose the shop type.
- In this once the order is place by the customer ,the Admin can send reminder to the vendor by clicking on the Reminder button in front of the fulfillment status,& an automatic mail will be sent to the vendor for fulfillment of the order.
- Admin can pay the vendors through paypal payment gateway.It is mandatory for both Admin & Seller to have Business Paypal Account.
- Admin can allow/disallow seller to delete the Product.
- Admin can allow/disallow seller to add product.
- Admin can easily upgrade or downgrade the plan.
- Admin can view the seller profile page of each seller by clicking on view button of action column on from List of sellers page.
- Customer/Buyer can rate the seller,& those ratings will be visible on store and seller profile page(back end).
- Seller can view his own details as User information in “My account” section after logging in.
New Features
Few of the new features are given below , to have the detailed list of new and upgraded features click Here
- Now We have introduced Shipping in Multivendor Marketplace App which will enable the admin to configure shipping methods from his end for sellers and sellers can configure the shipping methods on the basis on price or Weight of the product.For details click here : http://webkul.com/blog/shipping-shopify-multivendor-marketplace-app/
- Much more informative dashboard showing Total Seller , Recent Orders and their fulfillment status and details of Total sales.

- Now the product can be enabled or disabled from the product listing itself. and the filters to search the products is also introduced.

- An extremely amazing feature of Multivendor marketplace is “Reminder Feature” to remind the vendor for order fullfilment.

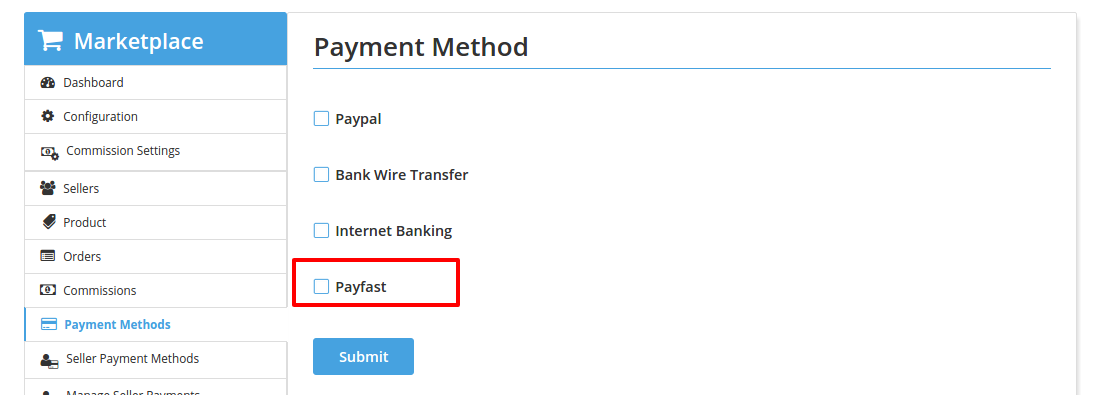
- Payfast payment gateway is newly introduced as a payment mode.
- Now admin can enable /disable the option of sending mails to the sellers/customer and can also edit the content of the automated mails sent to the sellers and customers from the mail configuration section

Video Guide
How to Install Shopify Multivendor Marketplace app?
Shopify Multivendor Marketplace- Configuration
Shopify Multivendor Marketplace- Commission
Shopify Multivendor Marketplace- Products , Sellers and Orders
Installation
-
Step 1 : On "Landing Page" you will find “TRY NOW” button. Click & enter your shop URL
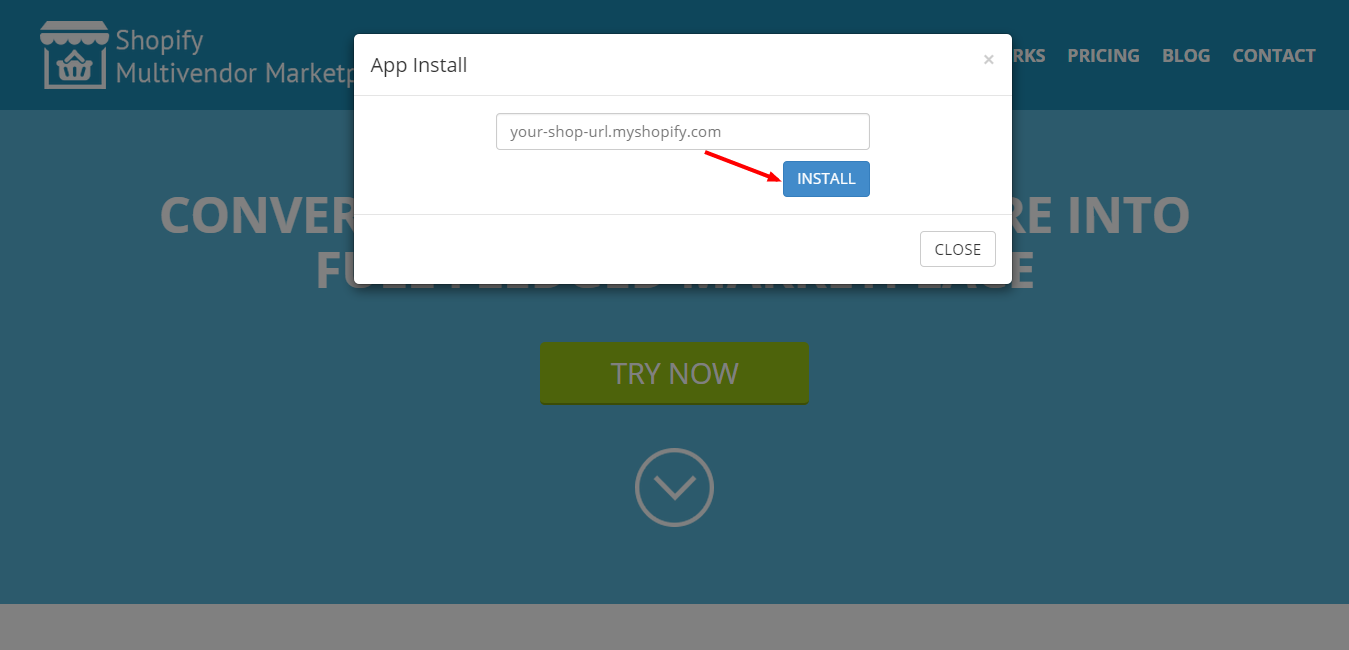
- Step 2 : After clicking on INSTALL button, it will redirect on your shop. From here you can install "Multi Vendor Marketplace".

- Step 3 : Now you have to choose any 1 of the plan as per your requirement. Each plan has its own benefits & specifications.
 NOW ITS ALMOST DONE, FEW MORE STEPS TO GO...
- Step 4 : Thanks For Installation

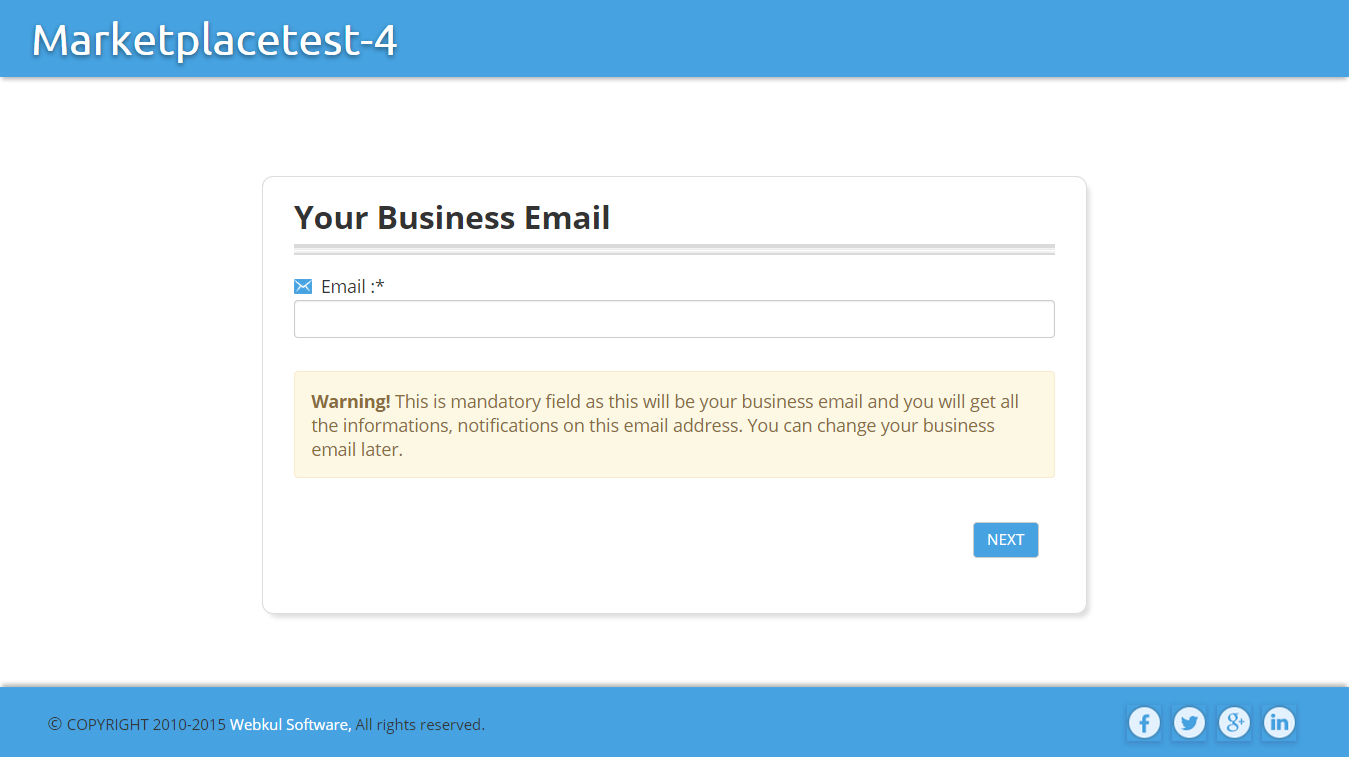
- Step 5 : Here you need to enter your email id.
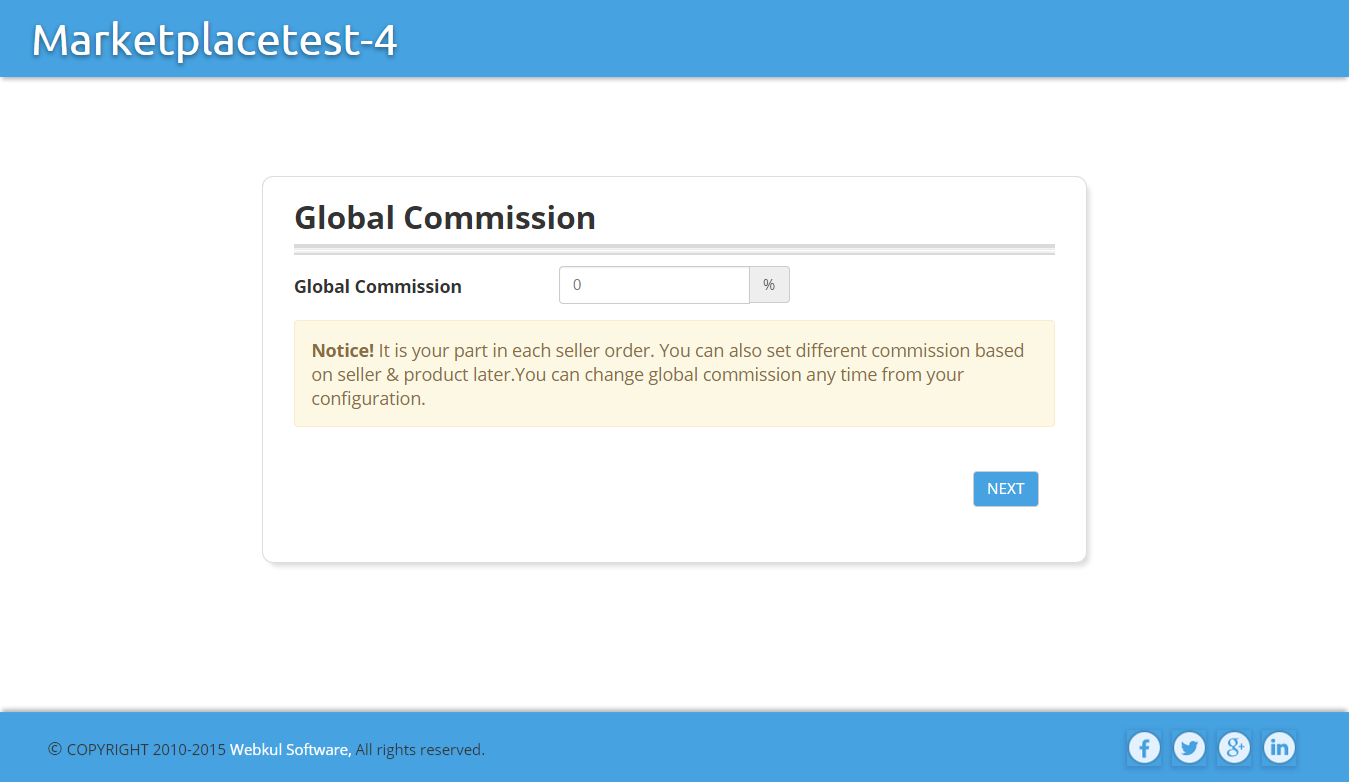
- Step 6 : Now you have to set commission. This would be global commission. You can modify it later from configuration & you can also add commission for individual seller & for product as well.
- Step 7 : Click on LET'S GO button & you are all set to experience your own MARKETPLACE with numerous sellers & innumerable products.

- When the whole installation process is completed then under Apps tab on your shop, you can find "Multi Vendor Marketplace" app

Backend Of Shop
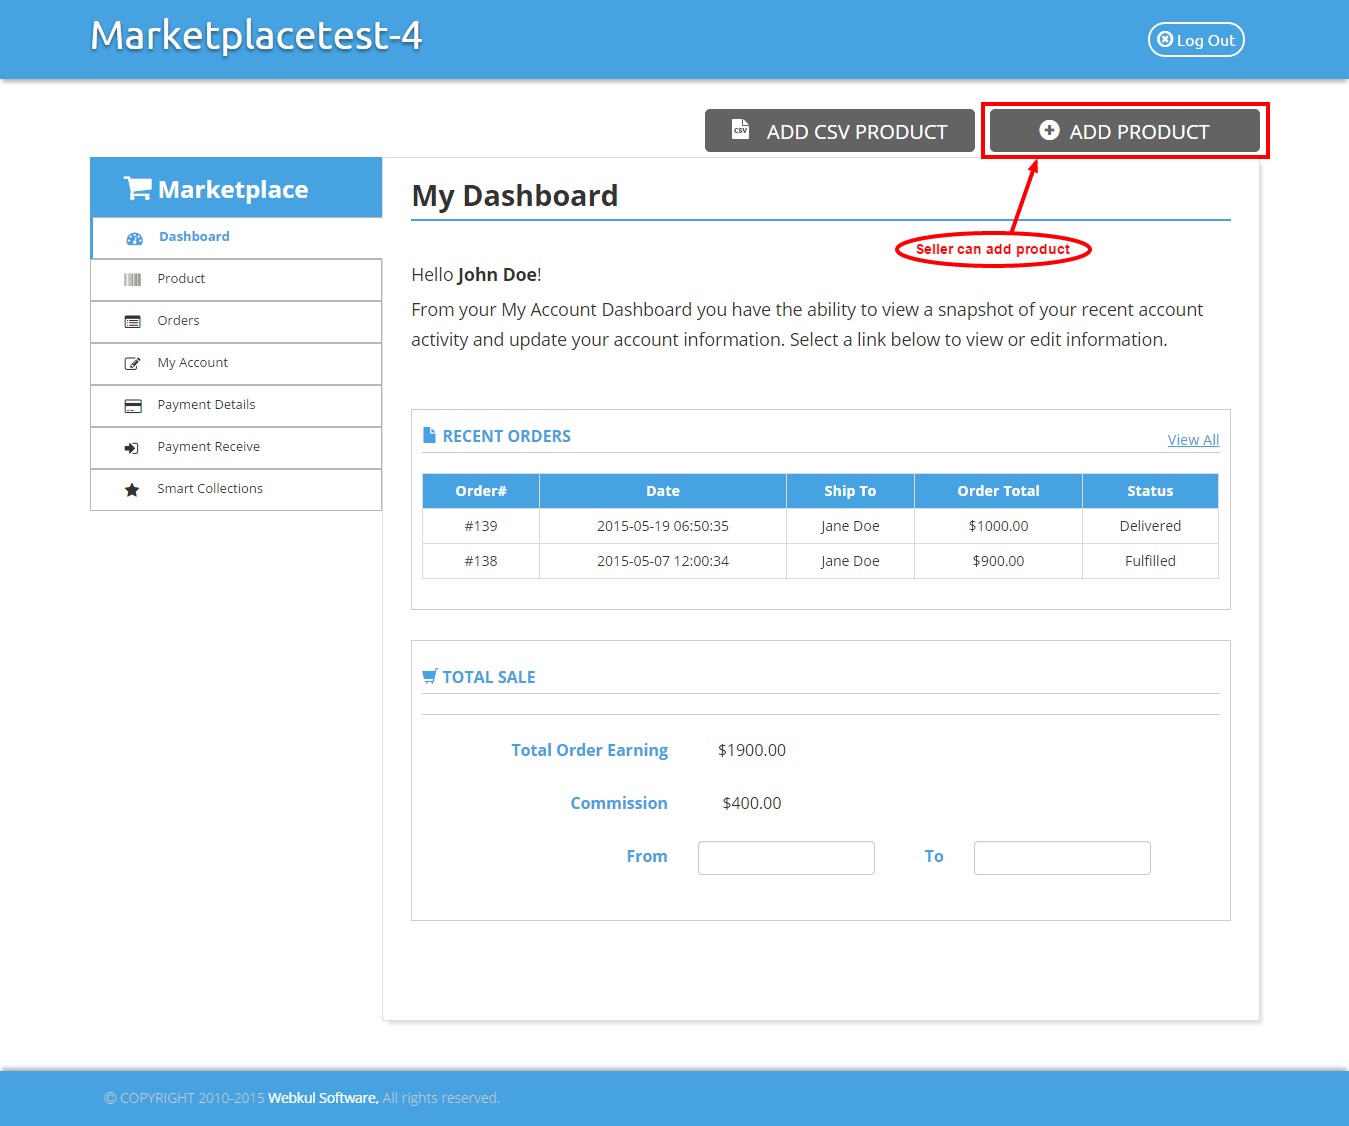
Dashboard
It provides complete details of total orders & sale on your shop. Admin can know about the total sales between any two specific dates, just pick date from date picker & admin will know about total order earnings & commission for that particular time. 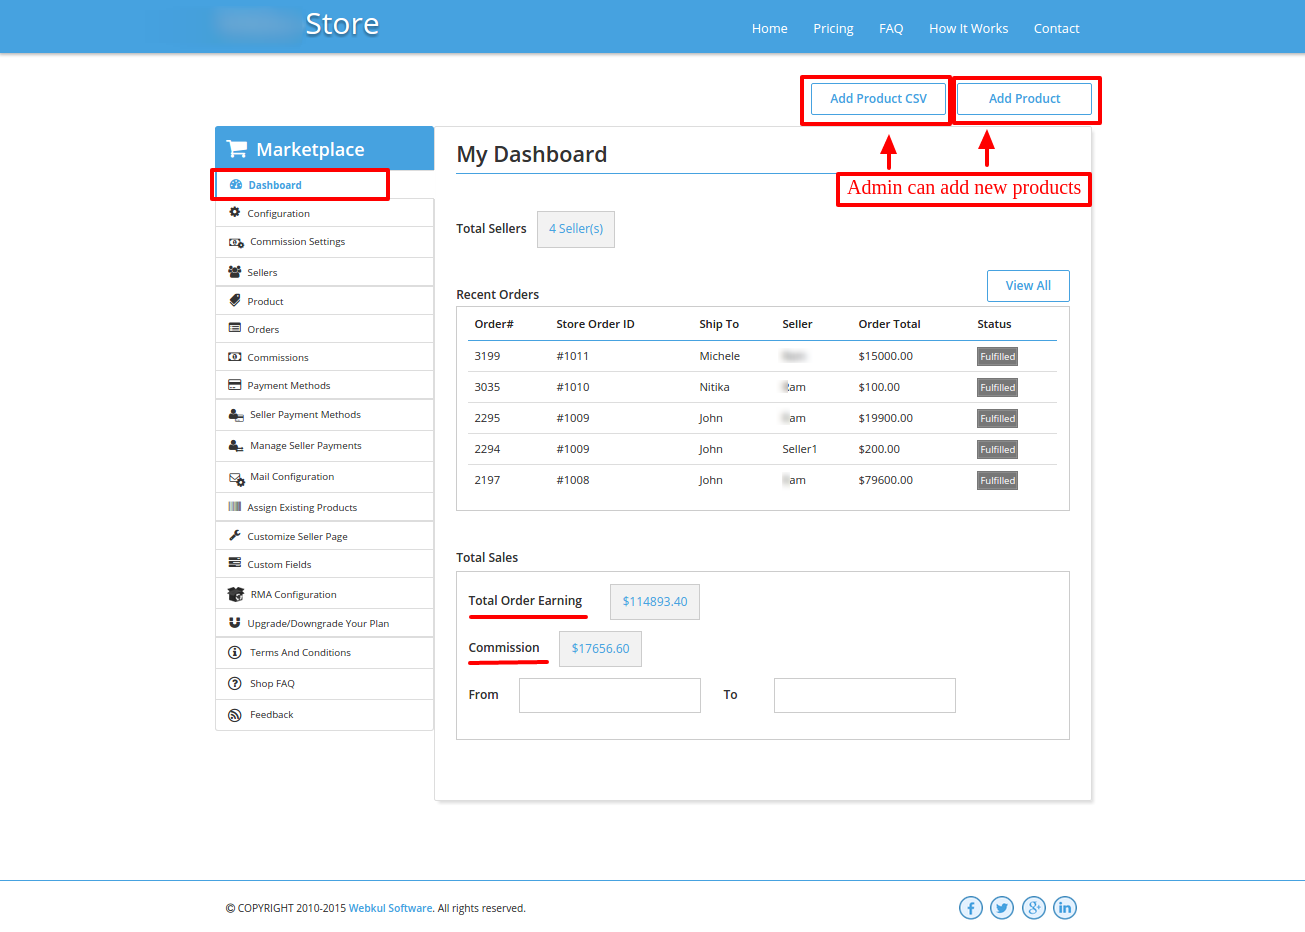
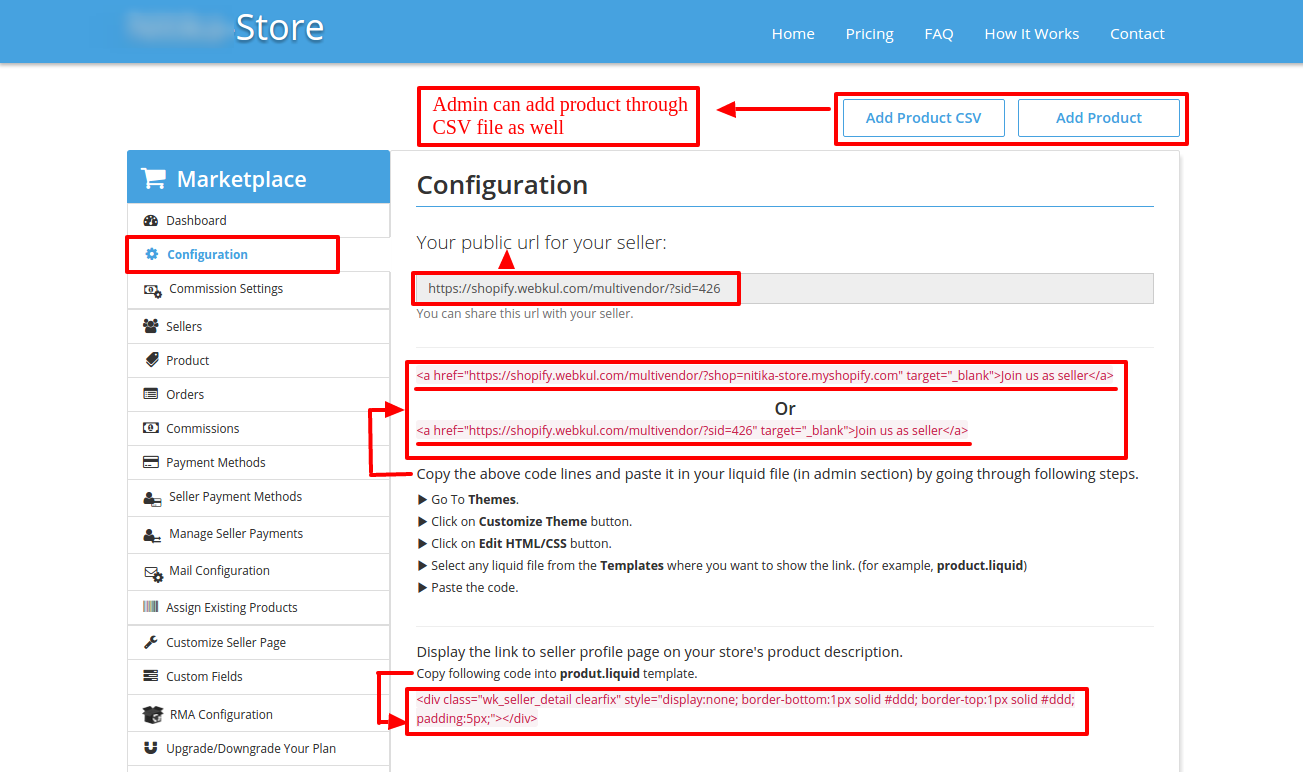
Configuration
From here Admin can do basic settings for his shop. To get the seller profile page link displayed on your store's product description: Copy below code into produt.liquid template -
<div class="wk_seller_detail clearfix" style="display:none; border-bottom:1px solid #ddd; border-top:1px solid #ddd; padding:5px;"></div>to have 'join as a seller ' button displayed on the store : Just copy the above code in any of the liquid file of Templates where you want to show the link for creating seller account.
<a href="https://shopify.webkul.com/multivendor?shop=[your shop name]" target="_blank">Join us as seller</a>or
<a href="https://shopify.webkul.com/multivendor/?sid=426" target="_blank">Join us as seller</a>*Note : In above code, "your shop name" would be the name of your shop. Ex : <a href="https://shopify.webkul.com/multivendor?shop=multishop.com" target="_blank">Join us as seller</a> Here "multishop.com" is the shop name.
GENERAL CONFIGURATION

- Business Email : As it is a mandatory field so you have to provide your business email id & you will get all the notifications of your shop.
- Domain Name : This would be your shop domain.
- Global Commission : Admin can set global commission for seller.
- Currency & Language : From here admin can set currency & language for his shop.
- Weight Unit : Admin can also choose weight unit for the products.
- Shop Type : From here, admin can choose the kind of shop that he want.
- Your Shop Logo : It allows admin to add shop logo to their shop.
- Mail Shop Name : Here admin can add shop name that will be displayed in mail header
- Shop FAQ : From here admin can set whether to show shop FAQ to seller or not.
PRODUCT CONFIGURATION

- Auto Approve Product : Here admin can set option for whether you want to approve seller product automatically or not.
- Product Add By CSV : Here admin can enable whether to add Product through CSV or not. Instructions & Sample CSV file has been mentioned on add product page.
- Allow Seller To Add Product : From here admin can enable whether he allows seller to add their products or not.
- Import Existing Product : Admin can set option whether to import existing products or not.
- Product Wise Commission : It will enable whether to set product wise commission or not.
SELLER CONFIGURATION

- Allow Seller To Fullfill Item : From here admin can set whether to allow seller to fulfill order or not.
- Auto Approve Seller : Here admin can set option for whether you want to approve seller automatically or not.
- Seller Add By CSV : Here admin can enable whether to add seller through CSV or not.
PAYMENT CONFIGURATION

- Paypal Sandbox : This will give an option to pay in Paypal using Sandbox (Test mode).
- Payfast Sandbox : This will give an option to pay in Payfast using Sandbox (Test mode).
-
Shipping Cost : Admin can set shipping cost distribution. This distribution can be done in 3 ways :
- Admin only
- Between sellers
- Between Admin & Seller.
-
Taxes : From here Admin can set tax distribution. This distribution can be done in 3 ways :
- Admin only
- Between sellers
- Between Admin & Seller.
RESTRICTION CONFIGURATION
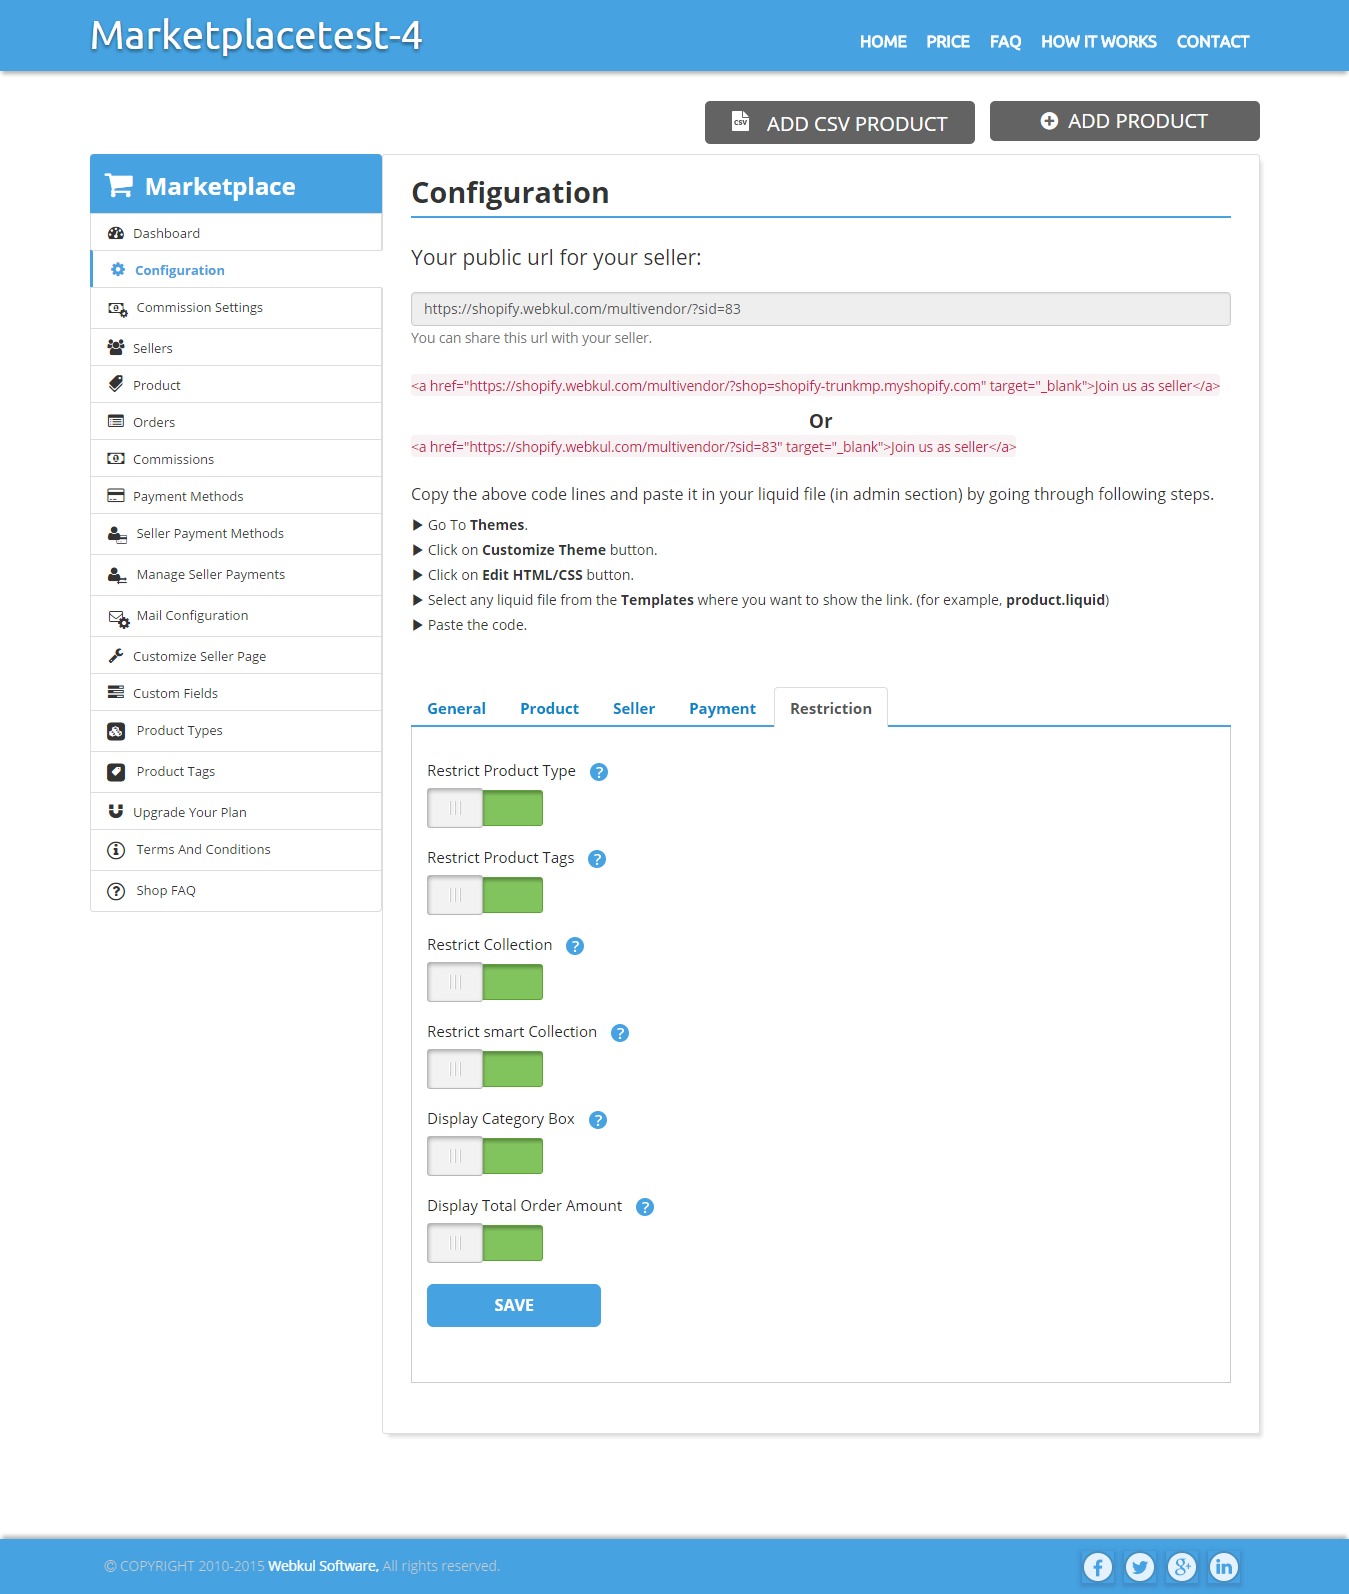
- Restrict Product Type : Admin can restrict product type for products on his shop.
- Restrict Product Tags : Admin can restrict product tags that are used as search keywords for the product.
- Restrict Product Collection : Admin can restrict product category/collection for products on his shop.
- Restrict Smart Collection : Admin can restrict the visibility of smart collections
- Restrict Category Box : This will give an option for choosing collections while adding a new product or editing an existing product.
- Restrict Total Order Amount : Admin can restrict whether to show the total earning of orders to seller on their dashboard or not.
Commission Settings
Admin can add commission for seller & can also view previously added commissions for seller. commission can only be added for active sellers. 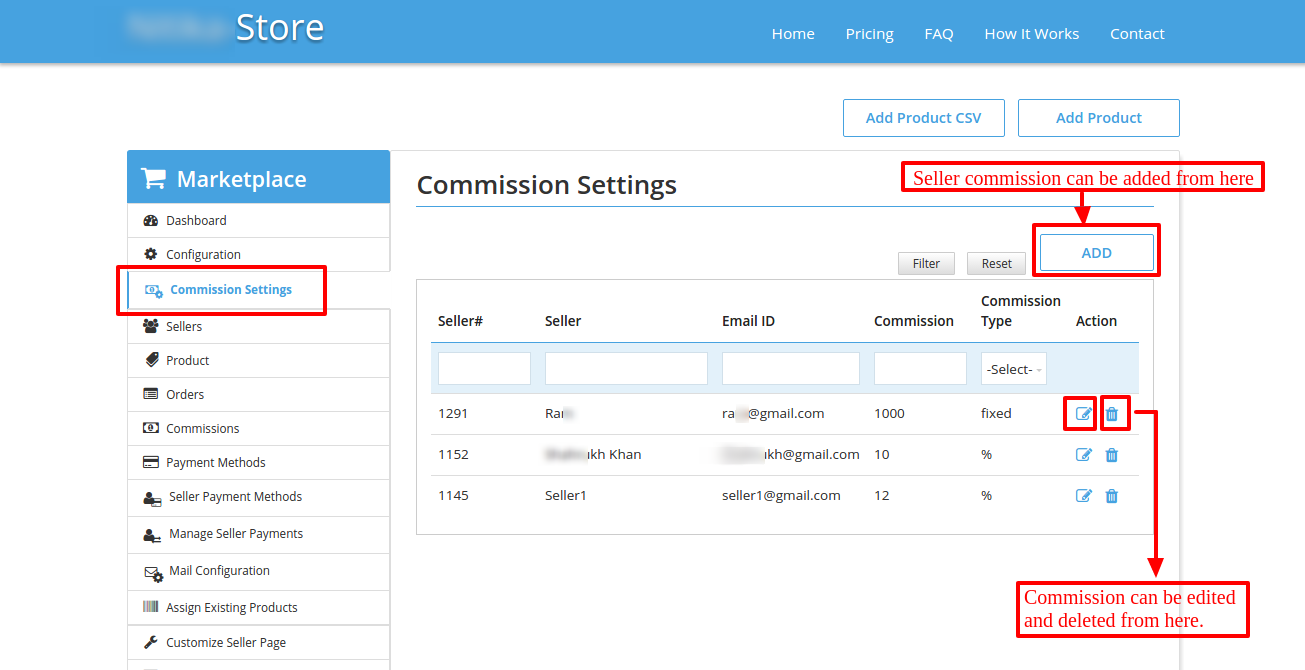
Sellers
From here, admin can add new seller either manually or just by uploading seller CSV file as per mentioned format. Admin can approve or disapprove seller & can also edit seller information. 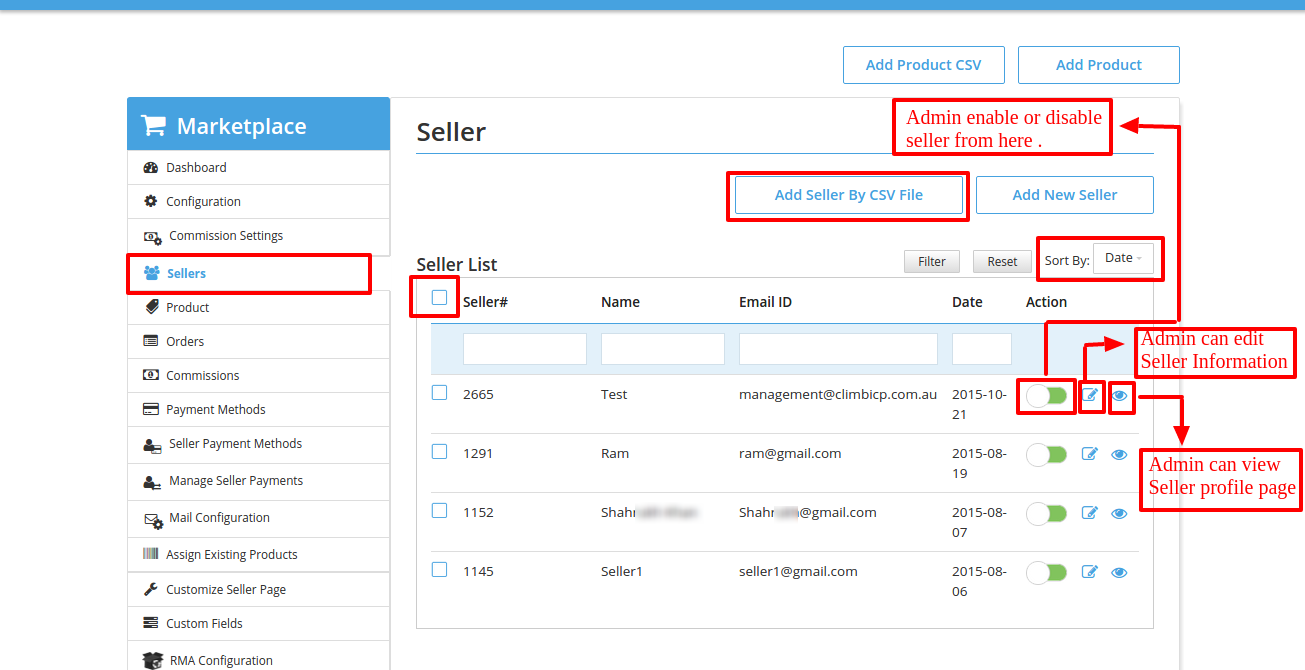
Products
Admin can see a list of products from different sellers. Admin can also approve/Disapprove product & able to view, edit or delete any of the products. Important Note : Also it is always advisable for admin to edit the product from our app only, as editing the product on app will automatically update the same on shopify and store frontend, but only editing the product from shopify end will not update that product on app and on seller panel of the app, hence this will create the discrepancies. 
Orders
Admin can view a list of orders. Admin can also search orders of any specific seller & able to view complete order details that also includes product & shipping details. 
Commissions
Here admin can know the commission details of sold product. 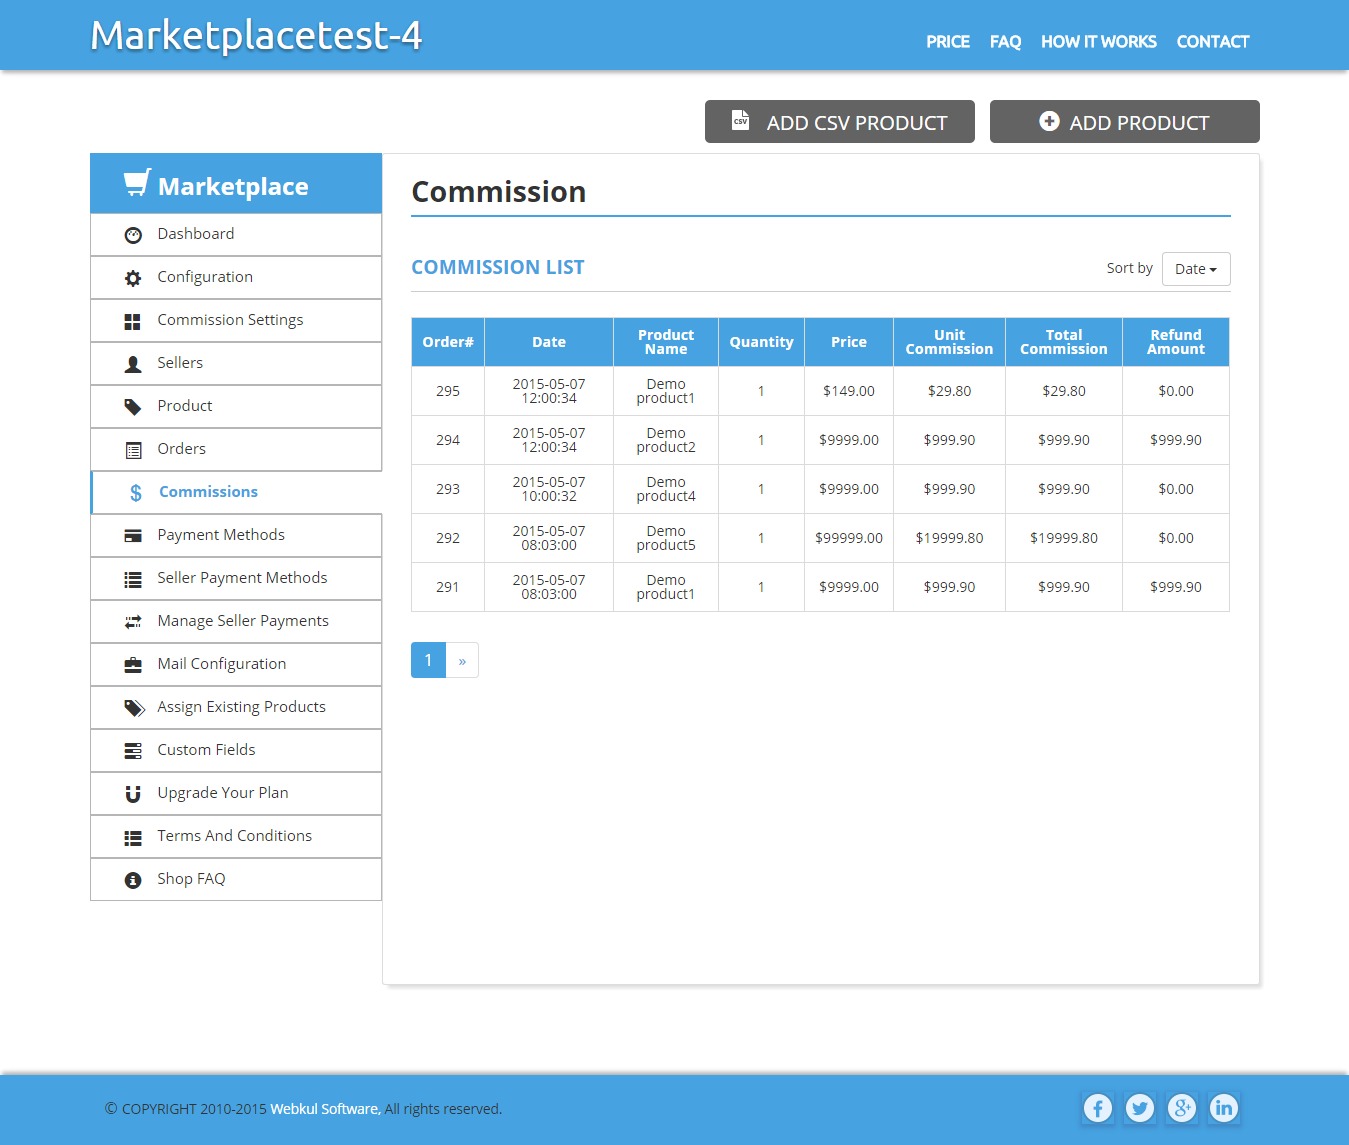
Payment Methods
Admin can set payment method from here. The selected methods will be displayed on seller’s frontend & from there seller can add the payment details as per payment methods provided by admin. 
Seller Payment Methods
Admin can see payment details of each seller. 
Manage Seller Payments
From here admin can manage payment of individual seller. 
Mail Configuration
we have provided default mail templates for seller approval, product approval as well as for sales that includes order details of products. Admin can modify the mail template as per their need & before editing any of the template, one should read the points that are mentioned in "Important Note" 
Assign Existing Products
This option will be visible, only if admin has enabled "Import Existing Product" from configuration. It will allow admin to import all the existing products on shop & can assign any product to any of the seller who is active on his shop. Admin just need to select "Seller Email" & "Product Name" from drop down. After selecting product simply click on "Add This Product" button. Admin can assign any number of products, just select the product from drop down & keep adding. After selecting the products, click on "save" button & all the selected products will be assigned to that particular seller. 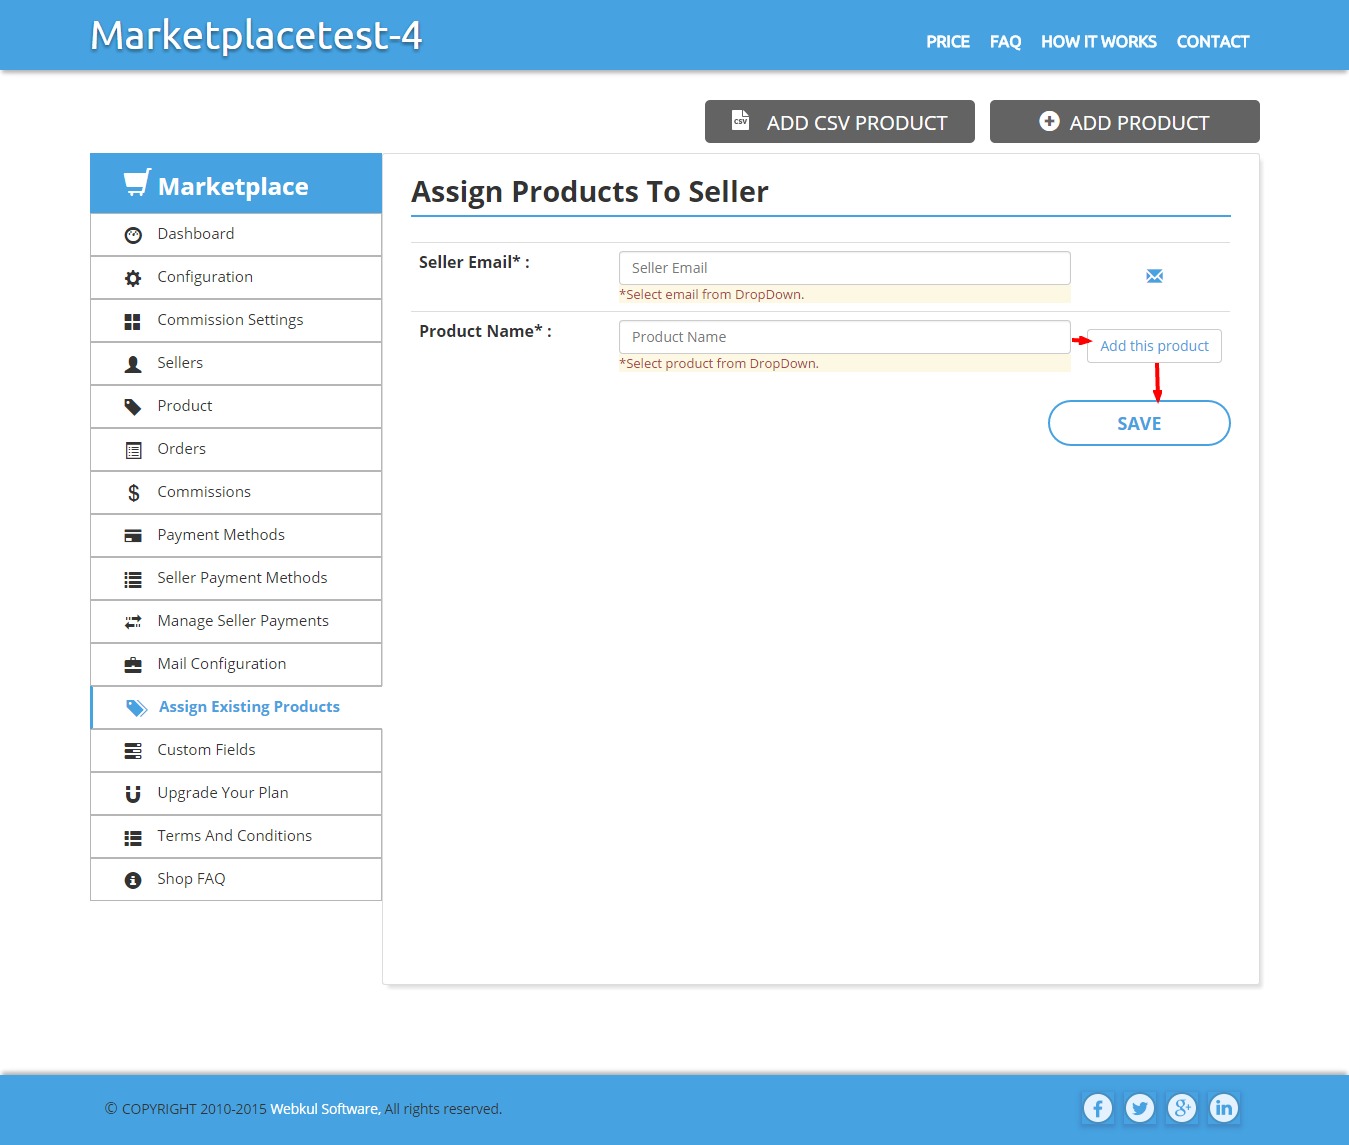
Customize Seller Page
Our Multi Vendor Marketplace comes with 3 different plans i.e. Bronze, Silver, Gold & each plan has different specifications & charges as well. If one has activated silver or above plan , then only he will able to view this option. We have provided various options for seller page customization. But "CUSTOMIZE THEME" will only be visible to those who have activated Gold or above plan. 
- UPLOAD IMAGE ICON : Admin can customize seller Signup & Login page by uploading image as per mentioned dimension.
- CUSTOMIZE BUTTON TEXT : This will add Customized text to seller "Login" & "signup" Button.
- CUSTOMIZE THEME : Simply add "Theme color" & "form background color" from their respective color picker & you are all set to view seller's page with new & colorful theme.
- CUSTOMIZE WELCOME TEXT : Here admin can add welcome text that will be displayed on seller login page.
Custom Fields
From here admin can add new fields in signup form. Admin can choose input type & can also set the order for any new custom field. 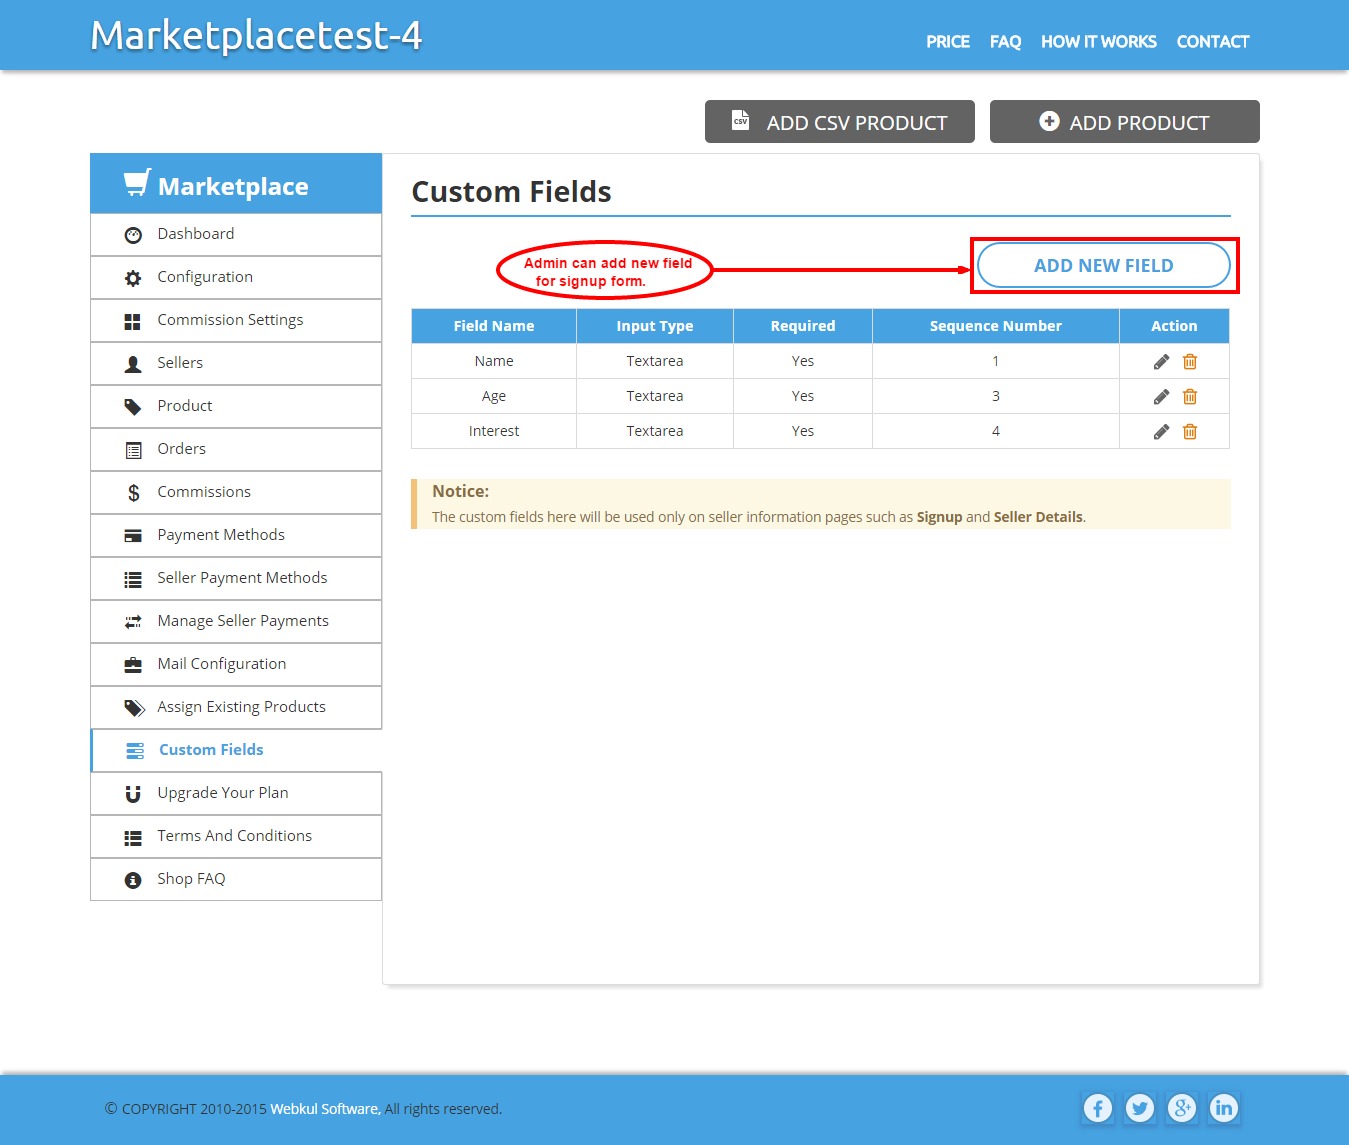
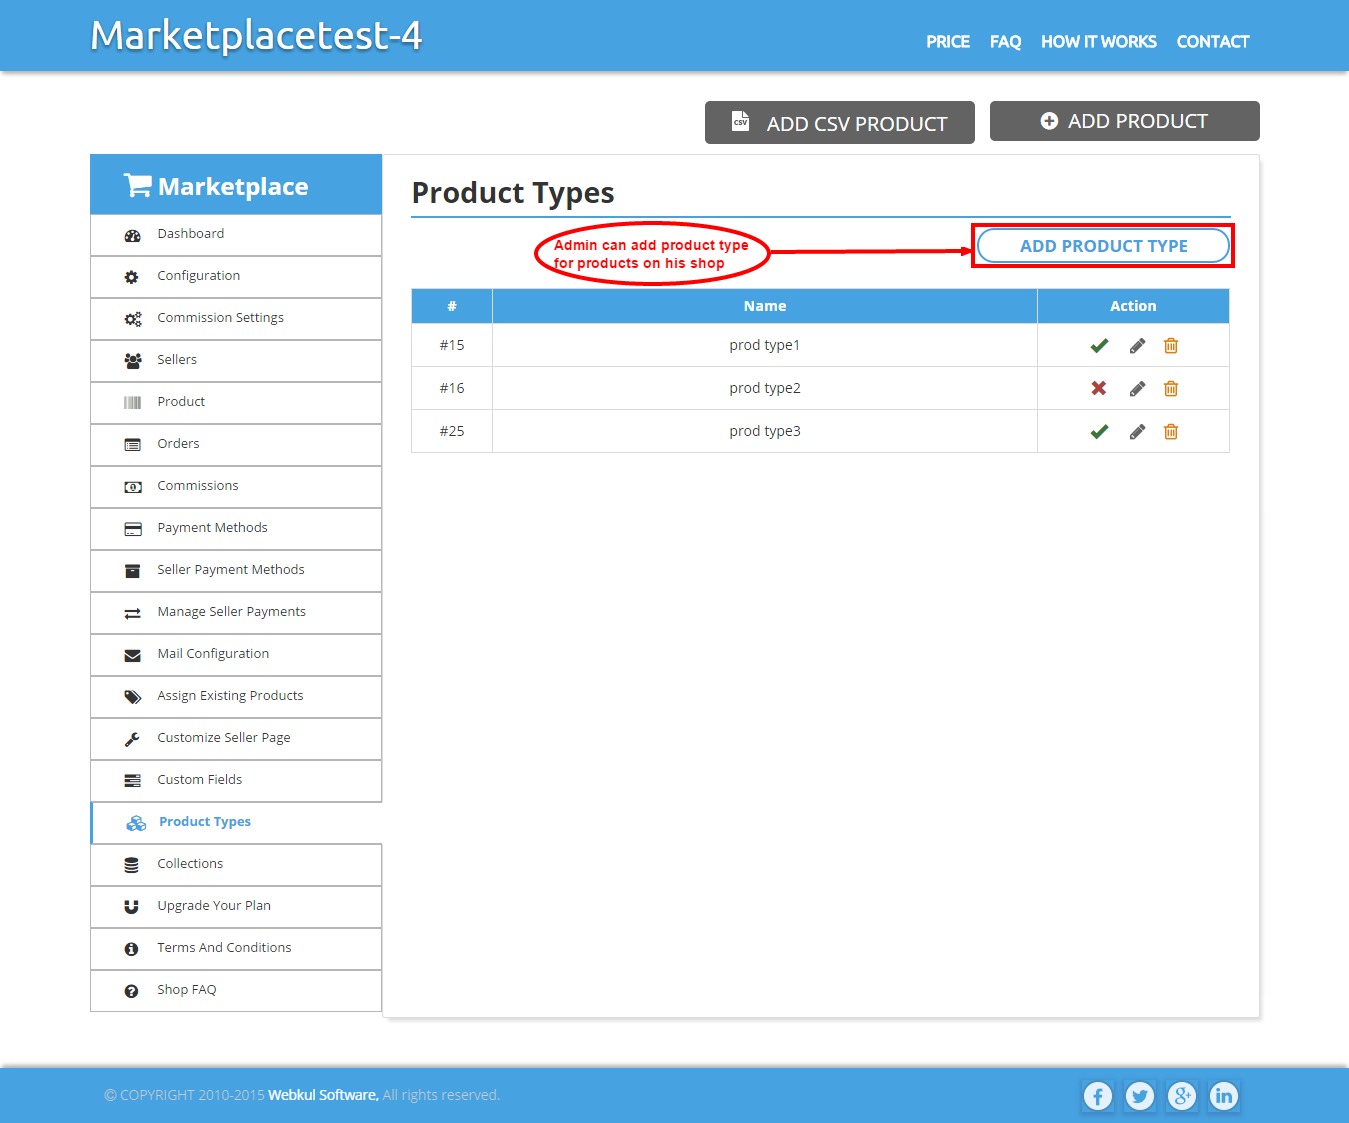
Product Types
From here admin can add product type for products on his shop. It will restrict seller to choose only from mentioned product type while adding any new product. After adding product type, Admin can edit, delete & also enable or disable any product type. This option of Product Type gets enabled when the option of "Restrict Product Type" gets enabled from restrictions setting in the Configuration. 
Collections
Admin can add collections/category for products of his shop. This will also restrict seller to choose only from mentioned collection while adding any new product. After adding collection, Admin can edit, delete & also enable or disable any collection. Admin can sync collection with shopify & can also import shopify collection. This option of Collection gets enabled when the option of "Restrict Collection" gets enabled from restrictions setting in the Configuration. 

RMA Configuration
From here the Admin can configure the RMA settings (RMA stands for Return Merchandise Authorization).Admin can edit ,enable or disable the option of RMA status for sellers. 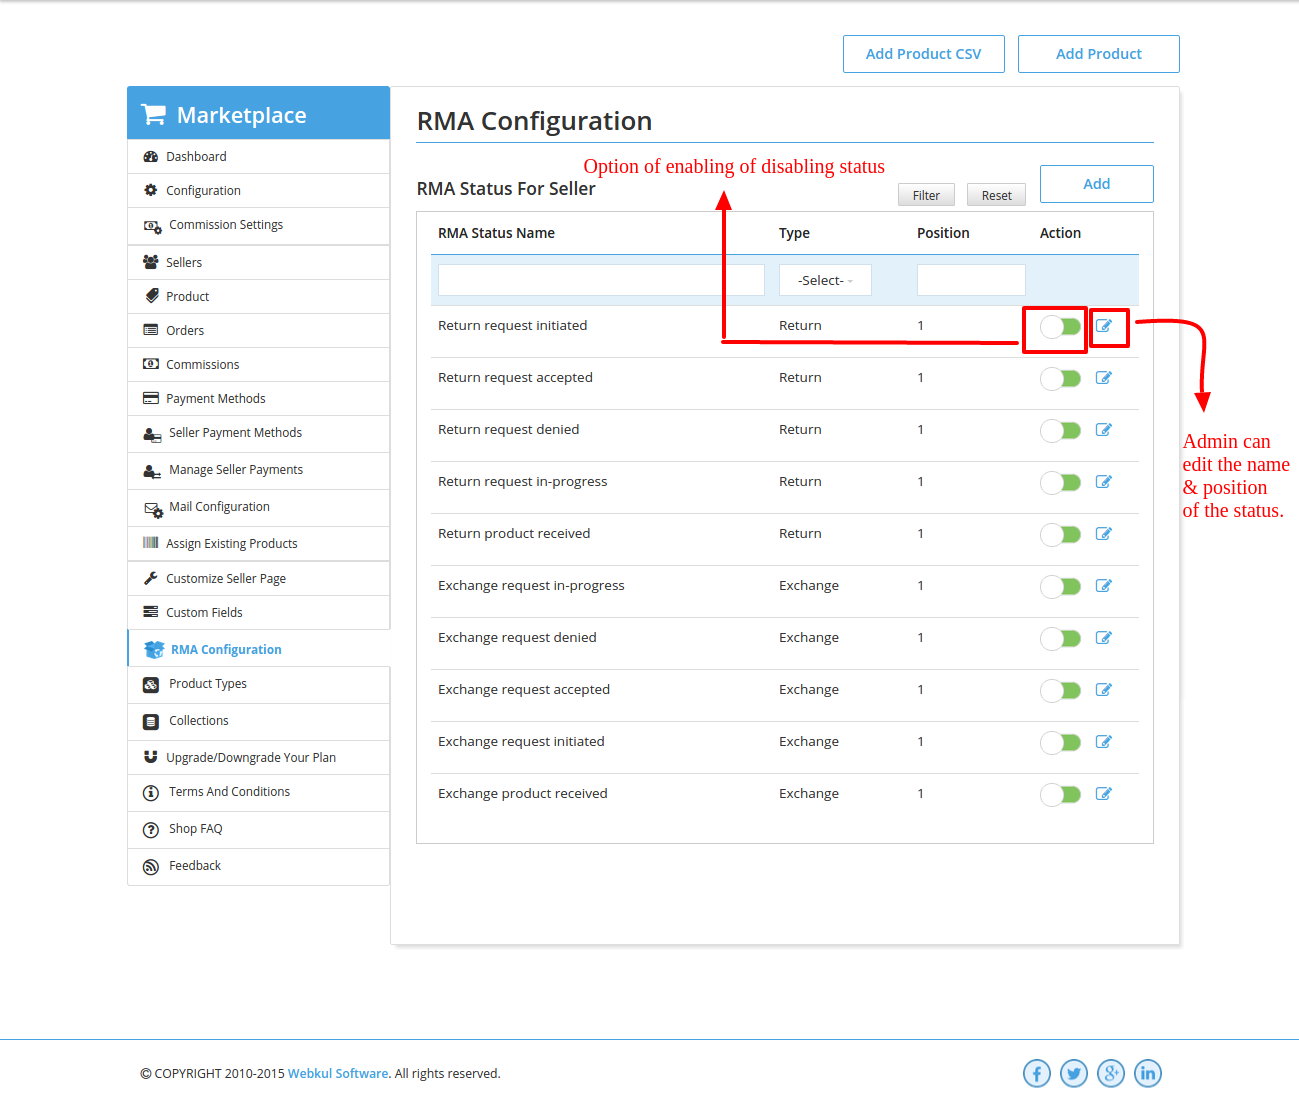
Upgrade Your Plan
Here admin can upgrade plan as per need. We provide 3 different plans & each plan has its own specifications & benefits.
- Bronze :This plan comes with free trial for 15 days. Admin can add unlimited products but with a fixed seller limit. Only 3 sellers can be active with this plan & if admin wish to add more sellers he need to upgrade the plan.
- Silver :This plan comes with free trial for 15 days. Admin can add unlimited products but with a fixed seller limit. Only 10 sellers can be active with this plan & if admin wish to add more sellers he need to upgrade the plan.
- Gold :This plan comes with free trial for 15 days. Admin can add unlimited products & unlimited seller :-)
Terms And Conditions
Admin can add "terms & conditions" for seller of his shop. These terms & conditions will be on signup form & it will be mandatory for seller to accept these "terms & conditions" for creating their account on your shop. 
Shop FAQ
Admin can add shop FAQ for his shop & these FAQs will also be visible to seller. 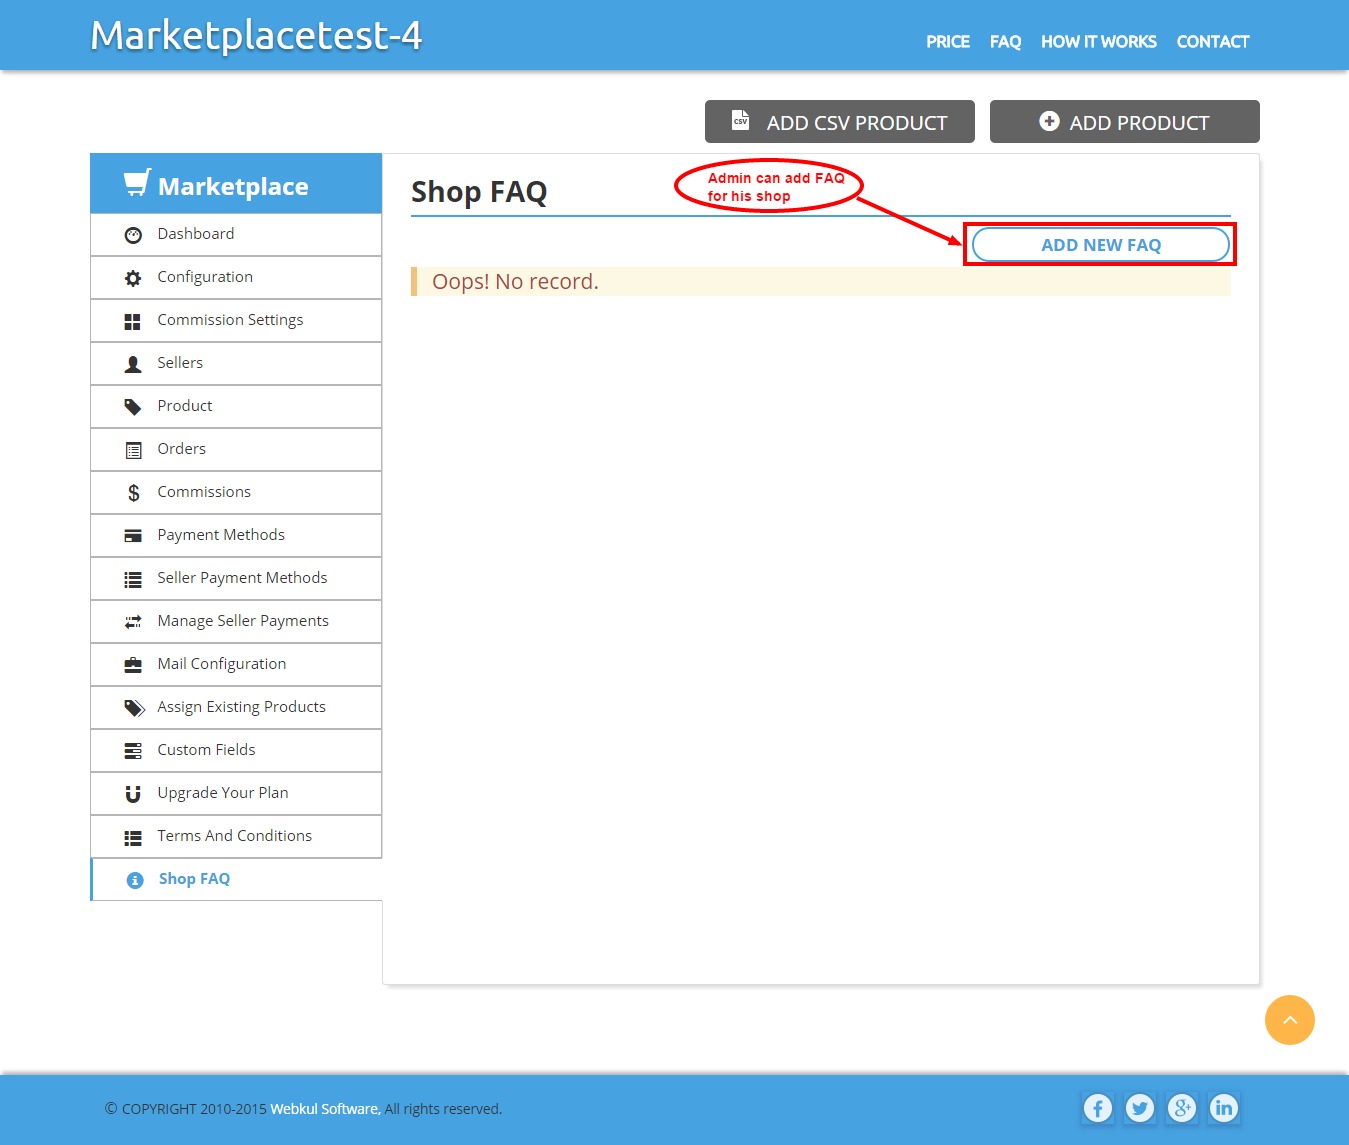
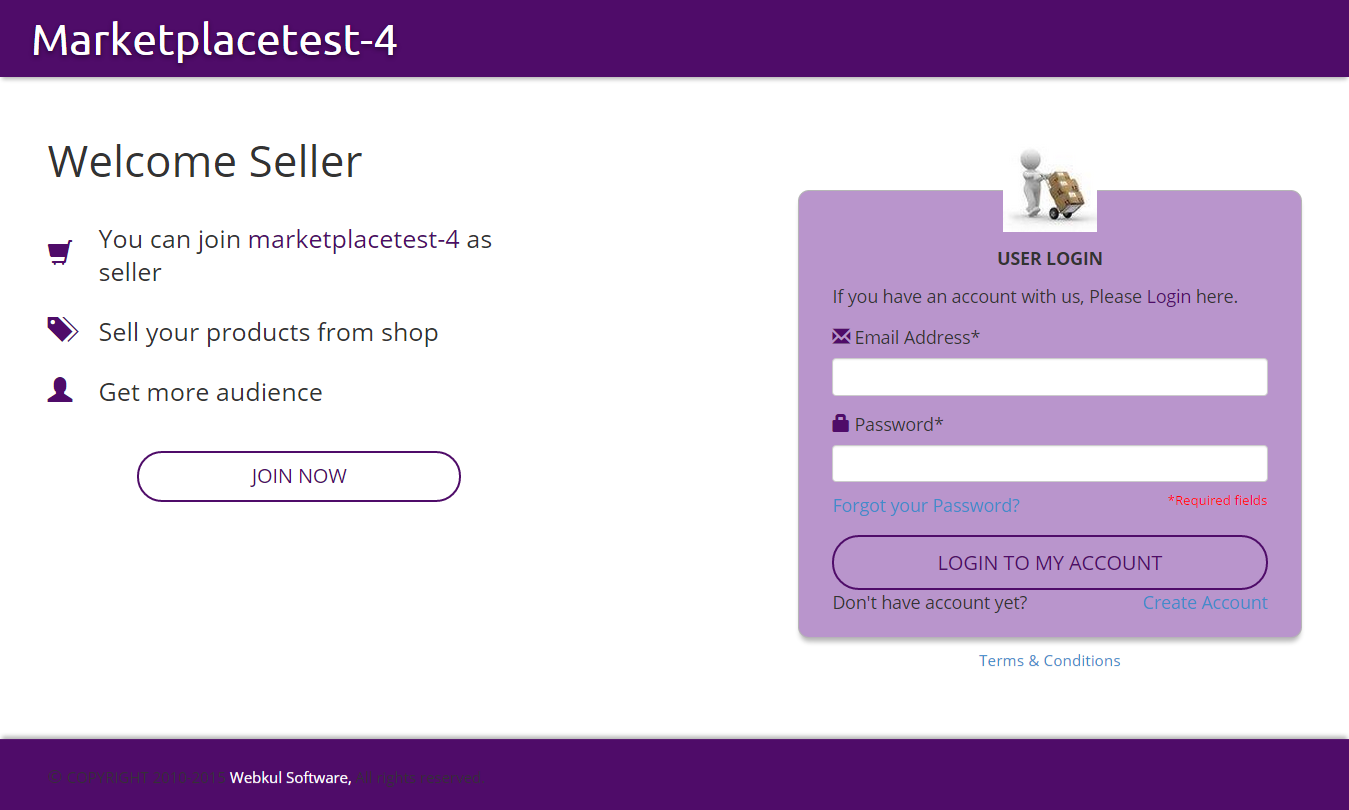
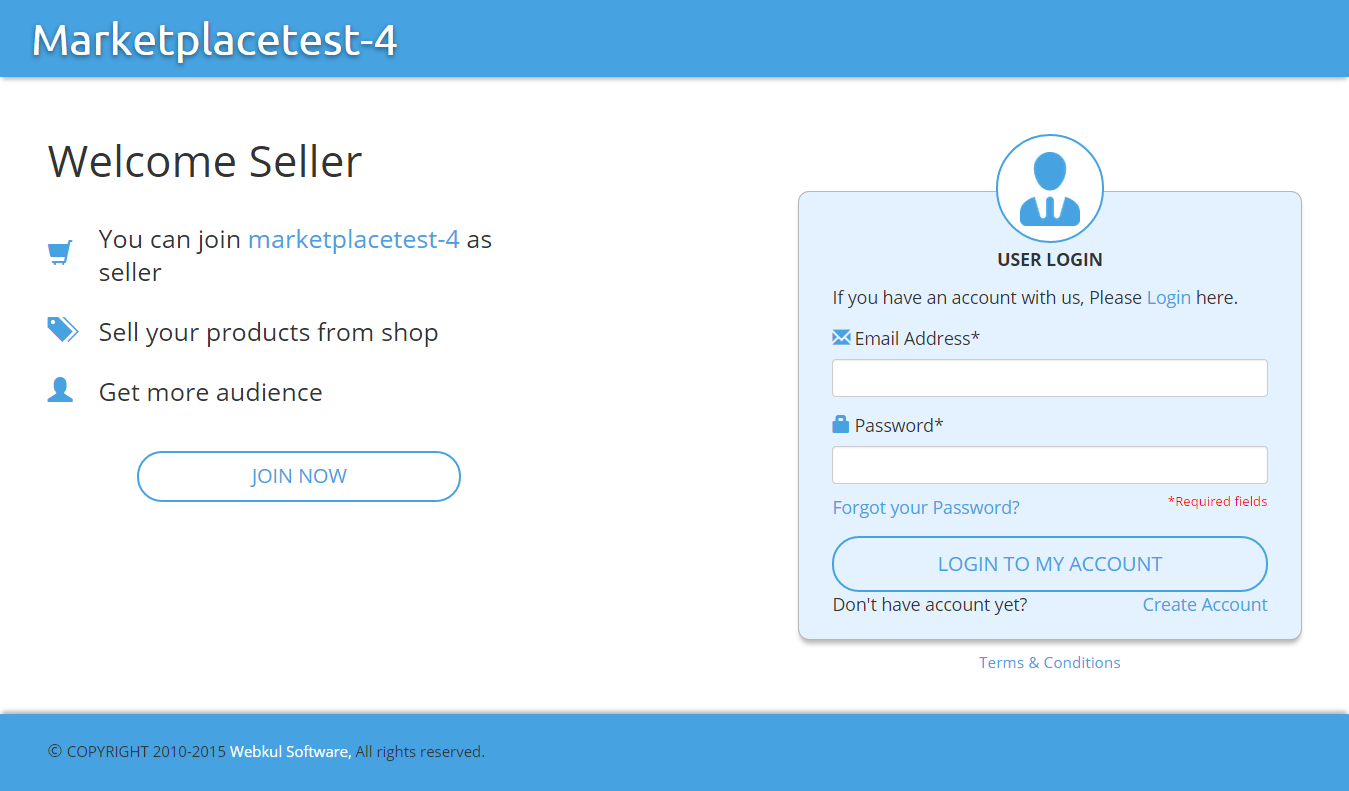
- Seller can signup or login through this link (Refer the screenshot). Seller will find the link on that page where admin has pasted the code which was copied from configuration. (As here the code was pasted in product.liquid file, so the link is on product page.)

- This would be seller login page (Refer the screenshot). Seller can signup through JOIN NOW or Create Account link. After entering valid email id & password, seller can login into his account.
Frontend Of Shop
Dashboard
It provides complete details of total orders & sale. Seller can know about the total sales between any two specific dates, just pick date from date picker & seller will know about total order earnings & admin's commission for that particular time. 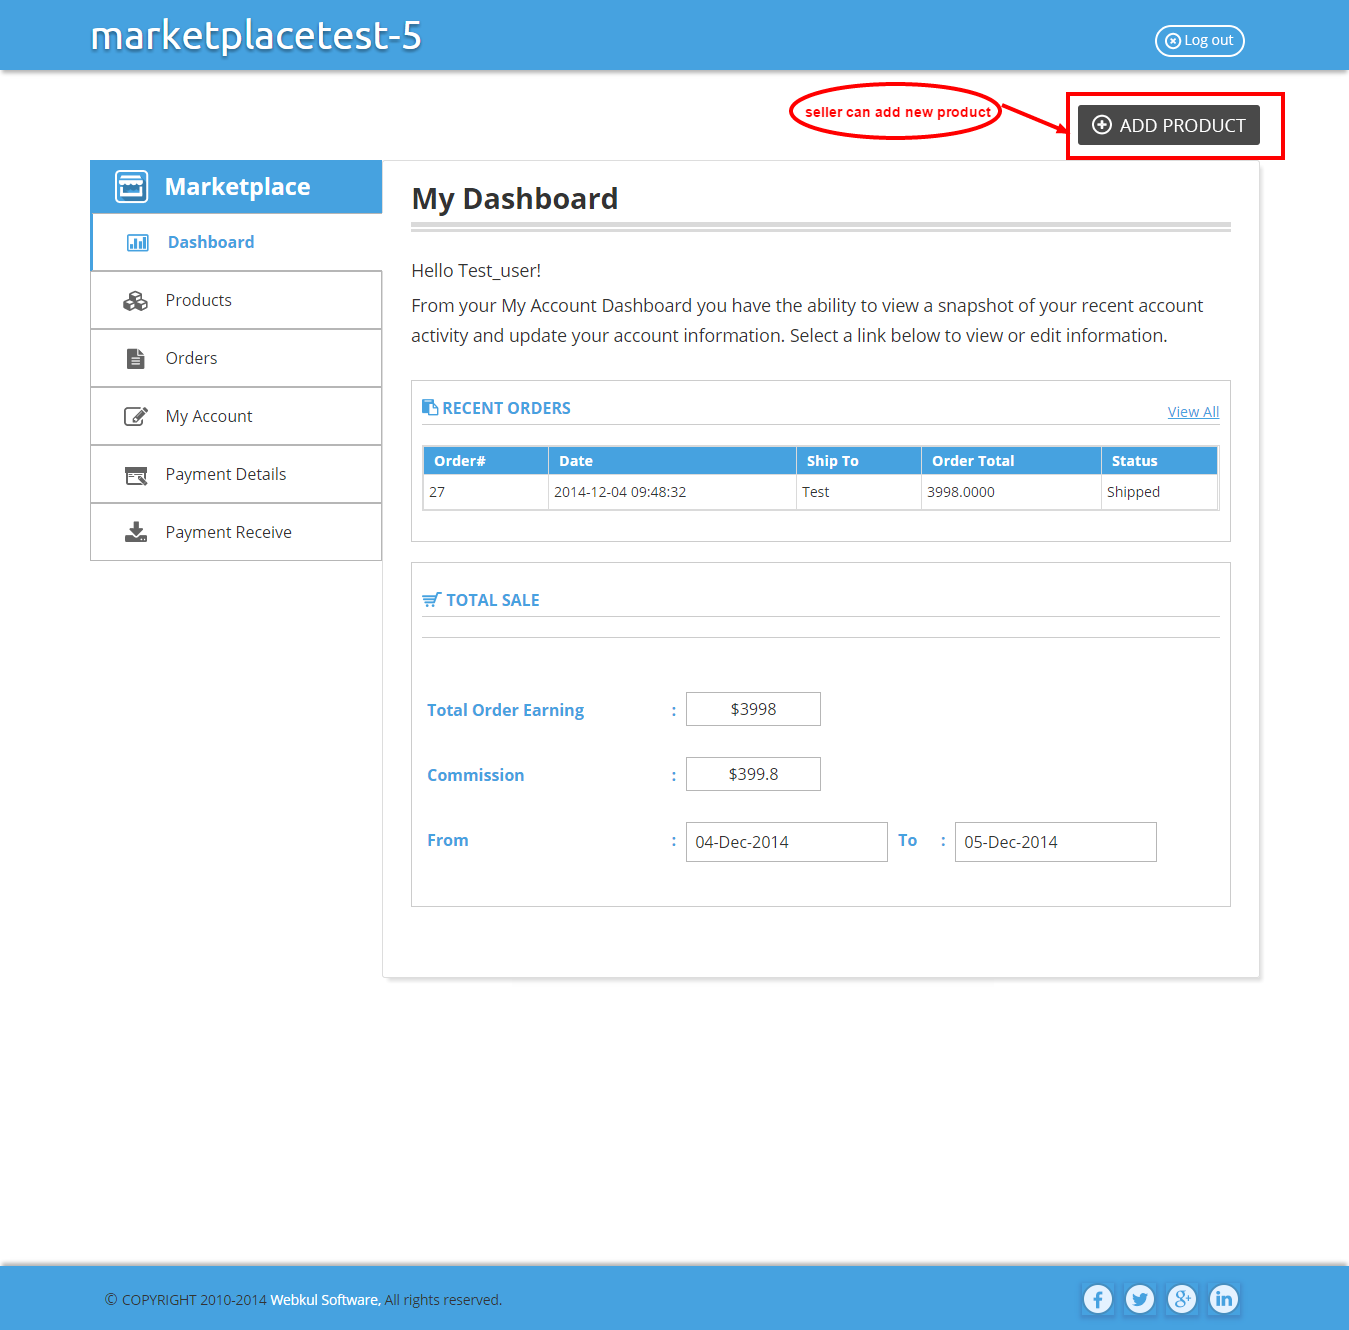
Products
All the seller products are listed here. Seller can edit, view or delete the products & can know the status of the product, whether it is approved or not. 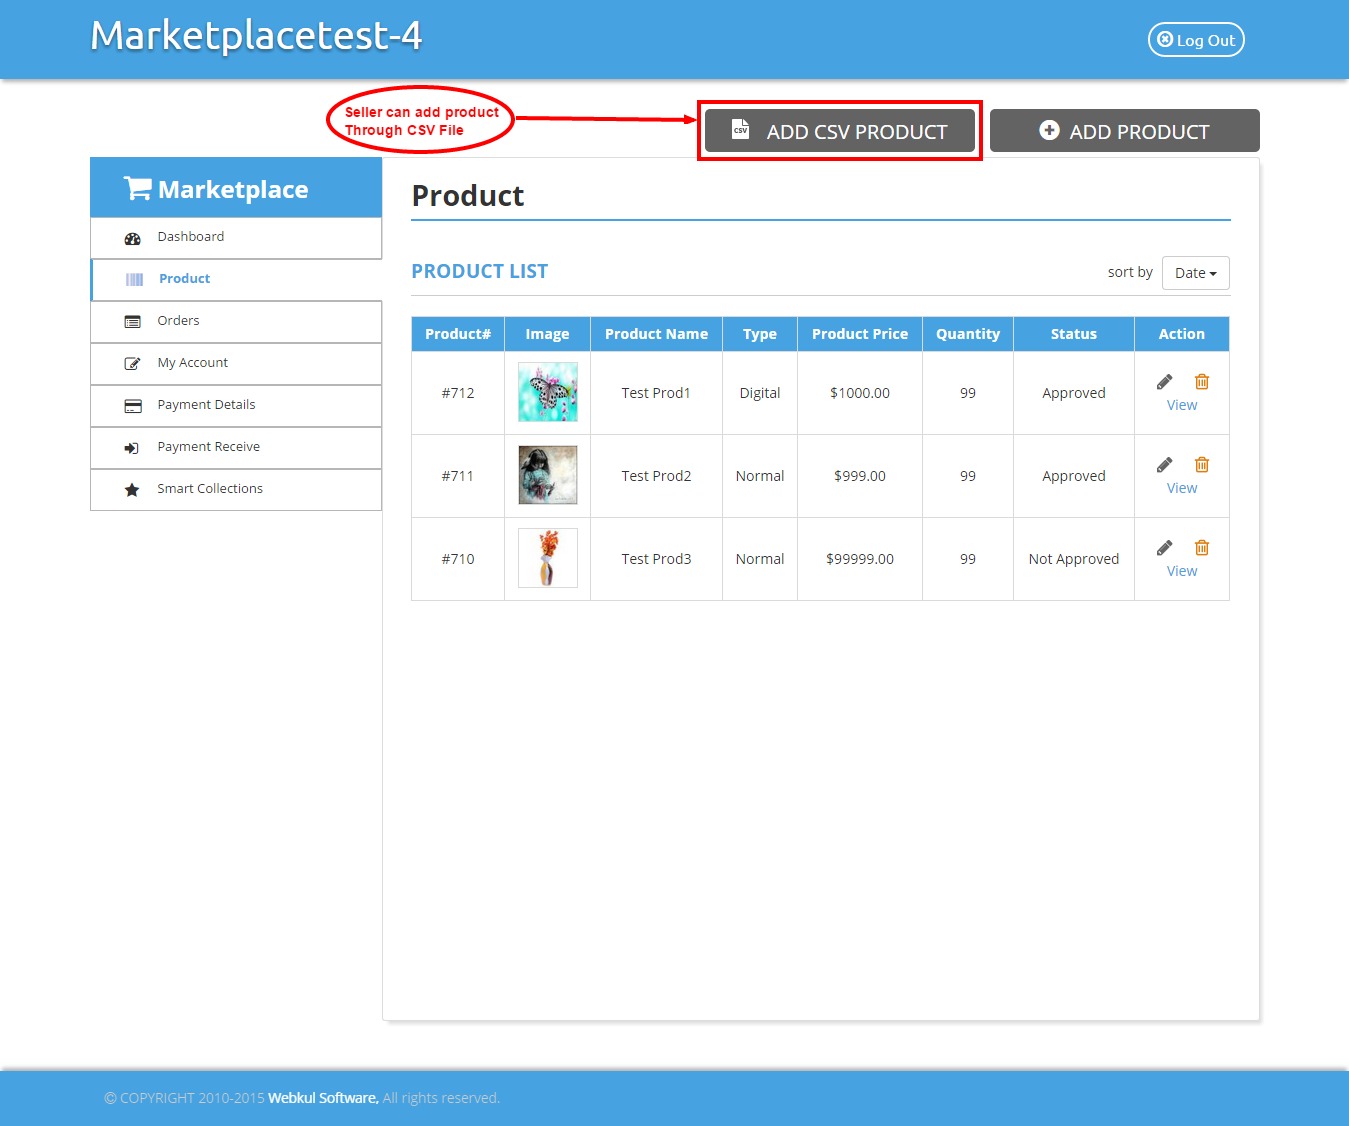
Orders
Here seller can see order list of his products. Seller will be able to fulfill orders & can set delivery date for any order. But seller can fulfill the order if admin has permitted to do so. 
My Account
From here seller will be able to change his information like name & password & can also know the total number of products & orders. 
Payment Details
Seller need to add payment details as per selected payment method & these payment methods are set by admin. 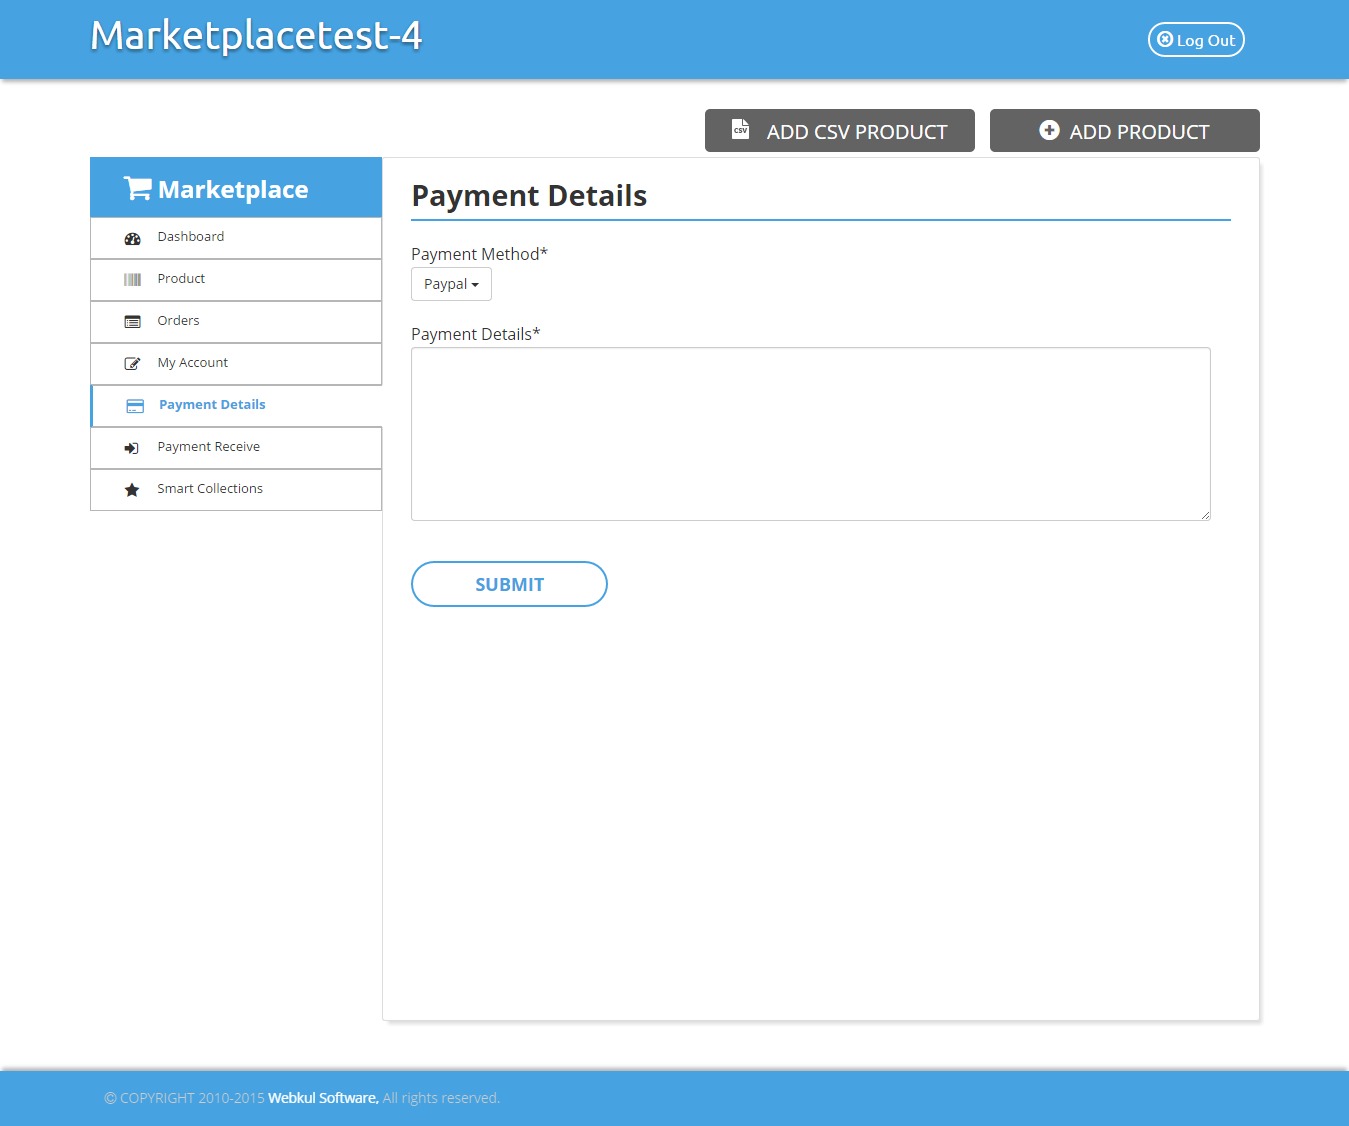
Payment Received
This will give details of amount paid by admin to seller. Seller will be able to know about the status of each transaction & can also search the transactions through their status. 
Demo
Find the below link and credentials to use the demo of Shopify Multivendor Marketplace App : FrontEnd Demo : http://multivendor-marketplace.myshopify.com/ Username : johndoe@demo1.com Password : webkul123 BackEnd Demo : http://multivendor-marketplace.myshopify.com/admin Username : johndoe@webkul.com Password : demowebkul
Support
If you need any kind of support/Consultancy then please raise a ticket at http://webkul.uvdesk.com/ or drop a mail at support@webkul.com Thanks For reading this blog!!! :-)